Tuesday 30 April 2019

30th Birthday Rhona


Hello

Another day, another 30th Birthday Card.  Same friend asked for a 30th Birthday Card for her daughter this time.  The theme could include Cats, Running, Afternoon Tea.  Couldn't decide with to use, so had a go at this, using them all.


I used my Scan n Cut, to cut out the base for this Accordion Card.   The remainder of the card is put together using die cuts and stamps.  Used Alcohol markers to colour images.

The recipient loved it, thank goodness, as I thought I may have gone over the top with this one!

Thanks for looking.


Tuesday 23 April 2019

Good Evening

This is a card I made for an order.  I can share it now that the Wedding has passed.  Hope you like it.


This card was made using Tonic dies and some other dies I had in my stash.  I attached the dies to a Square 8 x8 card and cut off the corners.  Printed off all the wording on a toner printer and foiled them.  Added some little flowers and a bow to finish it off.

Thanks for looking.


Saturday 20 April 2019

Moderne Flowers - again

I just love this stamp set.  It's such a beautiful little flower stamp.  To create the background paper, I stamped the Moderne Leaves onto pink paper, then embossed with white embossing powder.  I inked the edges of the paper with green and yellow distress inks.  I stamped the Moderne Flower 4 times with versa mark ink pad and embossed with white embossing powder.  I cut each flower out with a hexagon die and inked the background with yellow and green distress inks.  I coloured the flowers with water colours.  I used a larger hexagon die and cut out 4 in black card, and layered the flowers on top.  I used black card and layered the backing paper on top of this.  I cut out the sentiment with a die and made a messy bow.  Then assembled it all together.  On hindsight, maybe 3 hexagons would have been enough.


Friday 19 April 2019

Easter Bonnets

Hello Everyone

Something different for today.  My friend asked me to make an Easter Hat for her and one for her disabled son to wear to church on Easter Sunday. Mmmmmm and Easter Bonnet for a boy!!!!  This is what I came up with.  It was a little big I think, but Graham loved it.


Had some fun doing these, and loved the challenge!

Thanks for looking.


Sunday 14 April 2019

Wedding Card

I was asked by a friend to make a wedding card and was given a colour scheme of green/pink.  The card was needed for Saturday so it had to be a quick make!

8 x 8 card blank
2 sheets 12 x 12 card (for box)
A4 green glitter card
A4 pink pearl card
Dawn Bibby Leafy Wreath Die Set
Tonic Floral Favour Octagon Layering Set
Heart Die Set (not sure of brand its no longer in packaging)
Small Layer Heart (might be spellbinders but not sure)
Bundled Sage Oxide Inks
Laser Printer
Heat Foil
Gems from my Stash
Ribbon

I cut out the lace edge layer in Green Card, the ribbon edge in white card, the smaller lace edge in pink, then the last shape in white.  I cut the Leafy Wreath in White and inked with Bundled Sage Oxide Distress Ink.

I layered everything up, then die cut the heart in white and layered it onto pink, then fussy cut out the middle.

Printed the wording on laser printer (including the name section), then foiled both in my "Foil It" machine.  I cut the wedding information out of a simple heart shape die, then used a smaller one for the names.    I then matted the ornate heart on top of the wedding wording, making sure you could read it all.  I used foam pads and mounted this onto the Leafy Wreath.  Felt it was still missing something, so I cut out the flowers that came with the wreath die and added them around the wreath.

Finally I cut the names out with a small shaped heart, and also cut the same size in Green Glitter card.  I used a smaller plain heart the cut out the middle and layered it over the words and added it to the bottom of the card.  I added some gems to the middle of the flowers and 2 pink hearts onto the names within the heart.  I made a simple white bow and added it to the top left hand corner.  I didn't like the white space around the edge of the 8 x 8 card, so I cut it off and made an Octagon shaped card.


Beautiful Giraffe

I received my new Giraffe Stamp from Pink Ink Designs in the post yesterday.  This is what I made.

Products:

8 x 8 white card blank
A4 Black Card
A4 Glitter Card
Piece of Water colour card
Water Colour Paints
Piece of Ribbon
Pink Ink Design Stamp Set
Stamps by Me "Beautiful" word Die
Some gems from my stash

Added the piece of ribbon round the right hand side of the black card then matted and layered it onto 8 x 8 white card blank.

Stamped the Giraffe in the centre of the water colour card .  I used the flower and leaf dies from the same set to make the border around the giraffe.  I coloured them all in using the water colour paints.  When it was dry I added "Glossy Accents" to the Giraffes eyes.   I matted my coloured image onto the Glitter card.  I added the matted image to the left hand side of the card.

I stamped the leaves with green ink and embossed with clear embossing powder.  I used the water colour paints to colour them, then fussy cut them out (a labour of love).  I then shaped the leaves and adhered them along the ribbon.   Could have missed out the ribbon, as you can't really see it anymore.

Finally I die cut the work "Beautiful" twice, once in black and once in glitter card.  I drop shadowed the black card onto the glitter card, the adhered it along the bottom of the image.  All done x


Saturday 13 April 2019

Stamps by Me - Happy Birthday

Still playing with my new Stamps by Me dies and stamps.  I inked the background paper with pink green and yellow inks.  I cut the background out of white card.  Diecut a hexagon for the middle layers using green card.  I used the white cut out hexagon from the middle of the diecut background and coloured it with the same inks.  I stamped and embossed the flower stamp and coloured in with copics in bright colours.  Wasn't too sure this worked well, but it is done now.  Stamped happy birthday sentiment and added some ribbon and gems to add dimension.


Birthday Wishes

I got some new stamps and dies at the start of the week from Toni Darroch - Stamps By Me.  I love the die background dies.  For this one I used the "B" stamp.  I used a tiny flower from the stamp pack to make the top layer background.  Stamped with Versamark ink and embossed, then water coloured it light blue.  Then added splatters of yellow and light blue.  Stamped the "B" on white card, with black then added embossing powder.  I then cut it out with the corresponding die.  I coloured the flowers using yellow, blow and green watercolours.  I then stamped the sentiment and mounted it on glitter card.  I layered the card up with Navy card, then white diecut background.  I then added my next set of layers, white card, blue glitter card, navy card and the white background topper.  I used foam pads to give it some height.  I then shaped the B and attached it with pinflair glue, then placed the layered sentiment just underneath it.  Quite happy with this one.

Tuesday 2 April 2019

Overlapping Floral Bouquet

Good evening all

I watched a Video Tutorial a couple of weeks ago by Toni Darroch.  This is my take on what she did.

Products used:-

Tattered Lace Torn Edge Squares
Unknown Floral Stamp and Sentiment
Oxide Distress Ink Pink and Yellow
6x6 White Card Blank
1 scrap of white card
White Gel Pen
Water Colour Palette
Piece of Ribbon
Sparkling Gems

I cut the Glitter card to the size of mat and glued to card.  I used Oxide Distress Inks to ink up the piece of white card.  I used a paint brush and spattered water over the card then patted it dry with a paper towel to remove some of the ink,  Once inked I stamped the floral bouquet onto thewhite card and coloured with water colour paints.  Once the paint had dried off, I used 3 sizes of the Tattered Lace Torn Edge dies evenly spaced and cut.  This produced 2 Frames and a Centre square.  I glued the largest frame onto the glitter mat.  I put Sticky Pads on the next frame and fitted in in the centre of the first farme.  I then double sticky padded the spare and again placed it in the centre.  Whilst doing this, I made sure I lined up the flowers on the bouquet.  I made the Thinking of You banner and stuck in on the card with a bow.  I added some white dots over the card using a white gel pen.


Laura's Room Plaque - using A5 Girls Night Out Stamps


Good Evening

This is the last of my projects using my new Colourific Stamp Set.

Products Used:

MDF Plaque
Backing Paper from my stash
A5 Girls Night Out Stamp - by Colourific
A6 Moderne Flowers
A6 Leaves
2 shades of Pink Card
Gold Mirri Card
Glitter Card
Cream Card
Pink Distress Ink
Gems

I used one sheet of paper slightly larger that the mdf plaque, use cosmic shimmer glue and attached it.  I sanded of the excess, then inked the edges with pink distress ink.  I used a pokey tool to push through the holes.

I used my scan n cut to cut out the letters in pink and gold card.  I used the gold letters as a drop shadow.  I stamped the shoe image onto pink card, patterned paper and cream linen card.  I then paper pieced it all together.  I cut a second set of shoes and cut away the back one and layered the front one on top.  I shaped it and glued it onto plaque. I used the largest and next size down of Moderne Flowers and shaped them with a ball tool.  I cut 3 leaves out of gold mirri card.  I placed the flowers along the back of the shoes and added some gems.  I placed the leaves between the flowers.  I though maybe it needed something in the bottom right hand corner so added another flower,

My daughter has Severe Learning Difficulties has she was absolutely thrilled with this little plaque.


Cheers 70th Birthday Card

Made this one a couple of weeks ago.  Whilst I wanted to purchase this stamp, I am not that sure about it as yet.

Products Used:

Cheers Stamps by Toni Darroch
Black Card
White Card
Glitter Card
Het Resistant Acetate
Star Stencil
Pink distress ink
Paper Flowers
Stamens
Die Cut Leaves

I cut out 2 black mats, 3 white mats and 2 glitter mats.  I used a star stencil to ink starts onto the 2 larger white mats.  I placed the smallest white mat into the centre of the middle white mat, and stamped on the ink stains in pink and the glasses in black.  The stains and part of the stems of the glass overlapped onto bigger of the 2 mats.  I layered up the mats and attached them to the card, some are on sticky pads to give it dimension.  I then stamped and embossed the glasses onto heat resistant acetate.  I attached this over the original stamped image on the mat, using a little glue gel to raise it up a bit.  I added the flowers and leaves around the edge of the mat.  I added a birthday banner made using my Foil Quill, and also the recipients name along the bottom.  I added the wine bottle on the side and added a bow to finish it off.


Stamps By Me Floral Mount Stamps

Hi

I bought the collection of Floral Mount Stamps and Dies from Toni Darroch.  Haven't really had much of a chance to play with them.  Here is my first card.  Shortly after I finished this, I was asked to make a "Thank You" Card for a care home.  The persons relative lived for the past 5 years, before sadly passing away.

Products Used:

8 x 8 white card blank
Black Card
Gold Glitter Card
Toni Darroch - Artistic Mounts Collection2 - Floral Frame 1 Art Deco and Dies
Toni Darroch - Sentiment Stamp
Bottle of Dreamees Green and Purple Ink
Wow Bonding Powder
Sticky Pads


I cut out 2 black, 2 white and 2 glitter gold mats, and mounted them onto the card in order, leaving the last white one separate.  I stamped out the large floral dies twice, then the small flower twice, then the middle flower once. I also stamped out the group of 3 larger leaves 3 times. I used copic pens to colour the flowers and leaves.  I then cut out the largest flower from my second image and decoupaged it on top of the other image.  I stamped out the frame on scrap card.  U used the largest die and the next size down to cut the stamped image out to make a frame.  I stamped the sentiment onto the last white mat and foiled it using bonding powder.   I die cut a mat using the largest die and covered over the stamped sentiment.  Using the bottle of green and purple inks, and paint brush and some water, I made splashes/droplets of ink over the mat.  I attached this mat onto the card, the mounted the frame using sticky pads.  Once the frame was in place, I arranged the flowers onto the card, and added the extra flowers and leaves where I thought they looked best!  I got an inky finger print on the edge of the card, so had to add a little bow to cover it up!  This card was given to my Mother-in-law of Mother's Day.  The second card was made in the same way but using different colours.  It's amazing how it looks so different.  Wasn't going to put a bow on the second one, but my sister-in-law wanted it.


Stepper Card - Using stamps by Colourific

Here is another card made using the Colourific Stamps I purchased at the Craft Show in SECC.

Products used:

A4 White Card

Black Card for Layering

White Pearl Paper

A6 Leaves Stamp Set by Colourific

A6 Moderne Flower Stamp Set by Colourific

A6 Border Stamp Set by Colourific

Copic Pens

Green Distress Ink

I first of all used a Scoreboard and scored the shape for the Stepper Card, the cut along the edges and folded  to make the card.  I cut out mats using the black card.  I used an A5 sheet of white pearlised paper and made the background paper using the Border Stamps.  I then inked this in green.  I cut this into sections to make the last mat layers.

I used the Moderne Flower, middle size and cut out 17 flowers and coloured them with copic pens. I shaped the flowers with a ball tool and stuck then randomly onto the centre panel, adding a little white gel pen on each flower as a highlight.  I stuck gems in the centre of each flower.  I stamped the little butterfly from A6 Leaves, 3 times and coloured them with copics and attached to card

I made a banner for the sentiment using back and white card and used a peel off for the Happy Birthday.


Birthday Wishes Peek a boo card - Using Colourific Stamps

Hi

Once again, another card using Colourific Stamps.  Here are the products I used for this:-

3 sheets Black Card
Backing Paper from my Stash
Glitter Card
Bit of Lace
Glossy Accents
Honey Do Crafts Embossing Powder
2 sizes of Rectangular dies
A6 Modern Flowers by Colourific
A6 Flowers Marquis by Colourific
A6 Borders and Stems by Colourific
A6 Leaves by Colourific


I watched a You Tube Video by Norma Lee on how to do this, you can find it here: https://www.youtube.com/watch?v=MAuaJ3D6TIk

I cut the black card to the required size, then scored as instructed in the tutorial.  I cut the background paper to size and adhered to black card, and assembled as advised.  I used the smallest rectangle die to cut the aperture in each of the three places.  I then used both sizes of rectangle die to cut the frames from the glitter card for around the aperture.  I stuck on all three frames.  I then added a border made up of black, glitter card and the piece of lace.  I cut 3 sizes of jagged leaves from A6 Leaves and coloured with copics.

I stamped the Moderne Flower onto water colour card with a versa mark pad and embossed with pink Honey Do Crafts embossing powder.  I then used an A6 Border stamp to make the stem for the flower and added 2 leaves from the A6 Flowers Marquis stamps.  I used water colour paints to paint the middle of the flower pink and the leaves and stems green.  I used glossy accents in the drops on the flower and glitter glue in the centre of the flower.   I used a stamp from a magazine as the sentiment and stamped with green distress ink onto water colour card and embossed with clear embossing powder.  I coloured this stamp with water colours.  

This was a little confusing to work out to start with, but I think I have mastered it now.


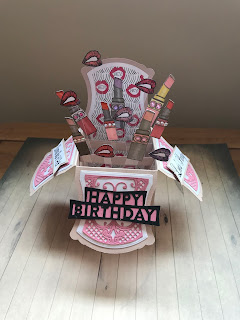
Lipstick Pop Up Box - A5 Girls Night Out Stamp Set by Colourific

Good Afternoon

Here is another card I made using the above stamp set.

Products Used:-

Pink A4 Card
Scraps of White Card
Scraps of Pink Card
Scrap of Black Card
Bakcground Paper from my Stash
A5 Girls Night Out Stamp Set by Colourific
Scraps of Acetate
Copic Pens to Colour
Tattered Lace Pop Up Box Die
Tonic Happy Birthday Die

I cut out the box die from Pink A4 Card, along with 2 bar pieces of inside the box.  I glued the box together, then added the bars into the centre, spacing them out evenly.  I used Background paper from my stash to put around the bottom of the box.  I used White Card for the mats on the side and back of the card.  I also used background paper for the back mat.  I used the scraps of pink card for the detailed mats on the box flaps.  I stamped out 4 large lipstick and 3 small lipsticks and coloured them with copic pens.  I cut out 6 of the small lips and coloured them in various colours.   I attached each lipstick and lips to a strip of scrap acetate, then attached the to the bars on the inside of the box.  To finish off, I used glossy accents on the top of the lipsticks and on each set of lips.  I added gems to each lipstick to add some sparkle.  I cut out the happy birthday from black card and matted it onto pink card.


Hot Lips - A5 Girls Night Out Stamps by Colourific

Hello again,

I made this quick little card using the following products:-

A5 Girls Night Out Stamps by Colourific
Black Card
Silver Glitter Card
Gems from my stash

This card is made using a 6x6 Card Blank.  I cut a Black and Silver Mat and added them to the card blank.  I used a piece of white scrap and made the border using the large and small lipstick stamps and the small lip stamp. I coloured the lipsticks in using copics and a metalic silver pen, then cut it down to the required size.  I added it to a black mat, I then used Sticky Pads to raise this from the main card.  I used a "happy birthday" sentiment from my collection and the "Hot Lips" from the Colourific Stamp set to make the sentiment.  I then matted it onto black and silver glitter card.  I used the large lips and added it to the edge of the border sentiment.  


Let's Party - A5 Girls Night Out Stamps by Colourific

Here is simple card that I made using the A5 Girls Night Out stamp set from Colourific.

Products Use

Backing Paper from my Stash
Black Card
White Card
A5 Girls Night Out Stamps by Colourific
A6 Borders and Stems by Colourific
Wow Unicorn Magic embossing powder

I used a 6x6 Blank card and matted and layered with Black, Backing Paper, Black then White.  I inked the white mat with Pink and Yellow distress inks.  I used a Versa Mark pad to add the borders and the shoes then embossed with Wow Unicorn Magic embossing powder.  I stamped the Leet's Party Sentiment onto with card and embossed with the Unicorn Magic.  I cut it into a banner and matted it onto black card.  


"Girls Night Out" Colourific A5 Stamp Set

On Sunday evening, I got to use my new Stamp Set that my daughter gave me for Mother's Day.  I love this set and made this 8 x 8 card.

Products Used:-

A5 Girls Night Out Stamp Set by Colourific
A6 Moderne Flowers by Colourific
A6 Leaves by Colourific
A6 Borders and Stems by Colourific
Enjoy Your Day Stamp by Stamps By Me
Wow White Sparkle embossing powder
Pink and Blue distress inks

I matted and layered an 8x8 card with black pink and white card.  On the largest white mat I used a leaf embossing folder and A6 Border Stamp.  I inked the smallest mat with pink and blue ink, then added a border stamp.  I chose the hatched background paper and Stamped the shoes onto it.  I coloured the insoles and heel lining with a pink sparkle pen.  I then stamped 3 of the larger moderne flowers onto the pink card and cut them out.  I then stamped 3 on to heat resistant acetate, and embossed with white sparkle powder.  I layered the pink and white flowers together and added a gem in the centre.  I cut 2 of each varying sizes of the other flowers and shaped and layered them with a gem in the centre.  I stamped several leaf stamps with green ink.  The layered it all up.  I love this card.


Monday 1 April 2019

Happy 70th Birthday

So I am back again!  So much for previous promises to myself to keep my blog up to date!  Made this card a long while back for a friends 70th Birthday.  I enjoyed making this with a shutter card die.  I cut out 2 of the dies and joined them together with a sheet of white card to make the double aspect.